
Showing posts with label made by me. Show all posts
Showing posts with label made by me. Show all posts
Friday, July 29, 2011
Fairy Door
Here's a fairy door I made from a piece of tree bark. It's in a hollow of a big tree in the kids' back yard.

Tuesday, March 22, 2011
Happy Birthday, Evan
My baby boy turned 22! Happy Birthday to the best boy ever!

 Package wrapped in tissue paper with black jewelry wire. I attached the green circles so they would "dangle" and drew the letters of his name on each circle. He loved it!


Monday, March 21, 2011
Birdhouse from Children's Book
Here's a birdhouse I made from foam core board and a children's Little Golden Book
 I first saw the idea on Daily Danny. His version uses a ready-made wooden house but I didn't have one and, like a lot of us out there, I'm trying to use what I already have for crafting from my existing stash. So, I had some foam core and used that instead. Just simple shapes, glued and Mod Podged. Simple.


Saturday, March 19, 2011
Vintage Stool Redo
This is my decoupaged stool. I used the comics pages from the Sunday newspaper to cover it.
 My neighbors put the stool out for the trash and I snagged it. They haven't seen the "new" version yet. Sorry I don't have "before" pictures but it was basically a gray metal stool with lots of paint spatters and stains. Not worth the work it would have taken to "restore" it. But I loved the shape and size of it so....
 So, I decoupaged it and then added several coats of acrylic because it will live in my kitchen and I need to be able to wipe it off. I added the little black feet to the legs so they wouldn't scratch the floor.
Here's what the back looks like. It was tricky getting the paper into all those crevices, but - if you get it wet enough the paper mold itself to the surfaces.
 So - what do you think? Easy weekend project (have to allow for dry time between coats of decoupage and acrylic).


Here's what the back looks like. It was tricky getting the paper into all those crevices, but - if you get it wet enough the paper mold itself to the surfaces.

Thursday, June 4, 2009
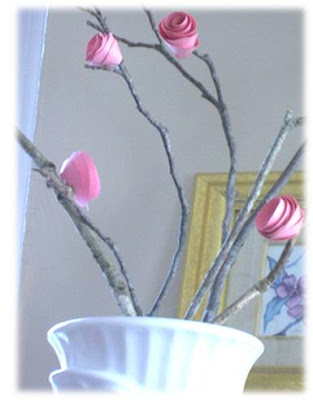
Making Flowers from Paper
Here is my first attempt at making paper flowers.
 I see these all over the place on the internet and I thought it looked pretty simple.
Plus - as you have seen - I love bare branches for decorating.
I used these little branches I collected at my mom's house (where there are a million trees on her property) and glued these pinkies on with a glue gun. I think they ended up looking like camellias

I did this vignette on my mantle a few weeks ago (yes, it's time to change it!) before any of my flowers started blooming when I was in desperate need of something "floral" to weed out the winter cobwebs.
 Off came the dark greens and pine cones and wintery things and out came white and pink just for spring.

If you would like to know how I made these just let me know and I'll post a tutorial - or at least I'll attempt to.
In the meantime, do you like these little cuties?
Here's a tutorial for making these paper flowers from Marie Claire Idees.
 I see these all over the place on the internet and I thought it looked pretty simple.
Plus - as you have seen - I love bare branches for decorating.
I used these little branches I collected at my mom's house (where there are a million trees on her property) and glued these pinkies on with a glue gun. I think they ended up looking like camellias

I did this vignette on my mantle a few weeks ago (yes, it's time to change it!) before any of my flowers started blooming when I was in desperate need of something "floral" to weed out the winter cobwebs.


If you would like to know how I made these just let me know and I'll post a tutorial - or at least I'll attempt to.
In the meantime, do you like these little cuties?

Here's a tutorial for making these paper flowers from Marie Claire Idees.
Wednesday, April 15, 2009
Bryson
 So many of you have been asking me for a picture of the new baby so here he is in all his glory!
I think he's about 6 weeks old here and look at those blue eyes!
He is the sweetest baby ever and his big sister loves him so much. She doesn't like it at all when he cries, which is not that often, and will come over and stroke his head if she hears him crying.
I could eat him with a spoon!
Sunday, March 29, 2009
Polymer Clay Dragon


Tuesday, March 17, 2009
Remodeled Bathroom


 Those of you who know me personally (Cara!) will know that we did this bathroom a while back but I thought I would put some pictures up since I have not blogged about it.
It was our first real project in our 1850s house. I wish I had "before" pictures...
What we did:
Painted. It's hard to see in the picture but the blue has a white wash over it. It was a pretty blue but just too bright, so I put several layers of white wash (white paint mixed with glaze) over it.
Replaced the floor (it was a horrible, white sheet vinyl before). We used the laminate tongue-in-groove flooring and it is a huge improvement. The floor has withstood a lot of moisture and wear and still looks good.
Built the sink cabinet from an old dresser. This was tricky (for Herby). We still had to have the drawers so we had to cut around the piping to make it work. I painted it white and added vintage hardware. I did a white mosaic tile on the top since it had to withstand being wet.
Replaced the sink, faucet and handles.
I made the backsplash with white tiles. This was to hide some ugliness in the wall behind the sink and also to allow for splashing (thus the term "backsplash").
New window shade and shower curtain.
The little black table has since been replaced with another white dresser to hold bathroom items and clothing.
Much improved!
Saturday, February 21, 2009
New Project Sneak Peak
Just so you'll know I am working on some things (while also working on painting the den, working on taxes, laundry and, oh yeah, my "real" job).
This project involves this box.
 The box contained an Ott-Lite, which my mom gave me for Christmas (OMG, can I just tell you how much I needed that?!) It was such a nice, sturdy box. Like a lot of you I can't bring myself to throw away a perfectly good box like this and its shape reminded me of something...
Check back in a bit and I'll show you what I've been doing.
(2/22/09 update - see next post for the completed project.)
Tuesday, February 10, 2009
Madison's Valentine's Day Card

Sunday, January 25, 2009
My First Ever Diaper Cake
My daughter's baby shower was yesterday. I was asked to do the decorating. Her last baby shower was for our sweet little Madison and very pink and girly. These are a couple of pictures of that shower to give you an idea.

 Since this baby is a boy and it's winter I thought I would do something bright and cheery. My daughter is not into the pastel baby blue boy thing.
Anyway, the cake...
I knew I wanted to do a centerpiece and I had seen diaper cakes before. She definitely needs diapers and I thought I could incorporate both of those requirements with this diaper cake.
There is a bottle of champagne in the middle around which all the diapers are wrapped. The "fondant" is white tissue paper. I wrapped ribbons around each layer and dotted the whole thing with bright polka dots I cut out of card stock. I made the flowers, as you can tell, from tissue paper.


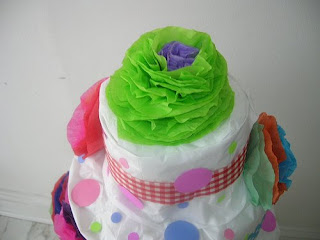 It took a little bit of work to get it right but I think she liked it.
 Since this baby is a boy and it's winter I thought I would do something bright and cheery. My daughter is not into the pastel baby blue boy thing.
Anyway, the cake...
I knew I wanted to do a centerpiece and I had seen diaper cakes before. She definitely needs diapers and I thought I could incorporate both of those requirements with this diaper cake.
There is a bottle of champagne in the middle around which all the diapers are wrapped. The "fondant" is white tissue paper. I wrapped ribbons around each layer and dotted the whole thing with bright polka dots I cut out of card stock. I made the flowers, as you can tell, from tissue paper.


Monday, January 19, 2009
One World One Heart
 2/12/04: Contest is Closed. Drawing will take place today. Thank you, thank you, thank you to everyone who entered!
I have decided to participate in a worldwide giveaway. This is just for fun and a way to make friends from all over the globe. I have met some wonderful people from all over the world through blogging. It is so fun to have "friends" from different countries; one learns so much.
So here are the rules:
You must leave a comment on this post here.
The contest is open to everyone.
I must have contact information for you. If your comment does not have an automatic link, just put your email address in the comments. (If you don't want to put your "actual" email address you can say "my name at yahoo" for example.)
The giveaway ends
Here's what I'll be giving away:
 This is Maxitron.
He is a handmade, one of a kind robot softie made of felt with hand embroidered features. He is my original design and would be suitable for a boy or girl or even adults who collect robots. Please note that Maxitron has buttons. They are sewn on tight but he may not be suitable for children who still put things in their mouths (choking hazard).
Visit the One World One Heart site to see a complete list of all the bloggers who have giveaways. Register for all of them if you like.
Good luck
Sunday, December 14, 2008
Madison's Christmas Dress
I made this little dress from a picture I saw so it's not my original design. This was a little bit of a challenge. The dress you see here is my third attempt. It's fully lined, "fur" cuffs and a little snowflake design on the bodice. I hope to get a picture of her wearing it.
How do you like the icy blue color?

How do you like the icy blue color?
Thursday, December 11, 2008
Christmas Card for Madison


Madison's Christmas Card
Originally uploaded by Madison Avenue
I saw an old vintage postcard of a little girl dressed in a snow suit holding a stocking full of gifts and a poinsettia.
It just struck me that Madison would look adorable in such an outfit. So I was lucky to find a picture of her that I could use. I just drew on the little snow suit around her picture. I put white glitter on the "fur" parts, gold glitter glue on the suit and clear glitter glue on her cap. I also added a few glitter snow drops.
Do you think she will like it? I am hoping to mail Christmas cards the first of next week. Do you still send Christmas
cards?
Monday, December 8, 2008
Christmas Kitty Card
 Here is a Christmas card I drew in pencil. I drew this from a photo.
Obivously, it's going to someone who loves cats. I am not sure I am 100% finished with this card. I'm thinking of adding a little something to the white "fur" on the hat just to make the white stand out more and look more...furrier...what do you think?
12/12/08 Update: I did add a little clear glitter glue to the fur on the hat and the pom pom. It was just the touch it needed. Now it looks more Christmasy.
Thursday, November 27, 2008
Christmas Ornaments Hanging in the Window
 I just liked the way these looked hanging in the studio window. I made these this year and have now given them to the kids. It almost looks like snow, but it's not. That's the white house behind me where the sun hits it and it gives off great light all day long.
Wednesday, November 26, 2008
Snowman
 I made this ornament based on Tone Finnanger's Tilda line. It's sort of a loose interpretation.
I made the button from polymer clay - my first one. The scarf is a little scrap of fabric from the dress I made for Madison for Christmas last year (sorry, no picture) and the wings are from the fabric I used to make her first birthday dress.
Felt Snowflake Dress Christmas Ornament
 I made this little dress out of felt with some tulle for a petticoat. I sewed on the snowflake beads and added ric rac for the trim and hanger. The tiny white ribbon belt completes this snowy little outfit.
Martha Stewart Popup Christmas Card
 I made this card from Martha's pattern. I like the way it turned out. I used a sturdy white paper with some swirlies on it that remind me of snow. This was actually my second attempt. I misunderstood the directions the first time around and cut my card completely in half the wrong way.
The card lays perfectly flat for mailing and the branches sort of pop out when the card is bent.
If you want to do this make sure you have a sharp xacto knife. It will make all the difference in the world.
Monday, November 24, 2008
Elephant on Wheels
 I used Hillary Lang's Pig on Wheels pattern to make this elephant.
I loved the pig she did but we're big on elephants around here and I made this for Madison to hang on the Christmas tree.
I know it's not very Christmasy but I think she will like it.
I had a little trouble with the gusset but with a little working it came out ok - not as nice as Hillary's but ok for a first try. Make sure you stop by the Wee Wonderfuls blog and also check out their shop for some other great patterns.
Thanks, Hillary.
Subscribe to:
Posts (Atom)


